Wednesday, December 23, 2009

Jaw Half-Mask in clay inspired by sensory cortex

Jaw Mask 2

Here is a photo of a new type of mask that I am experimenting with. I have seen this kind of mask made by a friend and fellow mask maker but this is my first attempt. The big lips were inspired by the diagrams of the sensory cortex that show the importance of the mouth and hands in relation to the the rest of the body in brain processing.

I am interested to see how expressive this mask will be once paper-mached given that the performer will have full use of the eyes and brow. I like it and it was a fun mask to sculpt. Maybe I will experiment with a few more of these "jaw" masks in the near future.

Monday, December 14, 2009

latest half-mask

This mask is still a work in progress. Originally, I had intended to sculpt this character as a full-face mask, but one I finished the upper lip, I knew I could go no lower. I tend not to make many half-masks but I am beginning to experiment with them. They can be quite enjoyable to sculpt and equally as enjoyable to perform.

Friday, December 11, 2009

New gallery postings along with a puppet blast from the past

noodles

Noodles is here to announce five new masks officially posted to the gallery. Even more will be posted soon.

This photo of Noodles was taken today along with mask photos for the gallery. He was a puppet I designed and built a little over a year ago for a collaborative performance piece. He was my co-host on a crazy psychedelic cooking show gone wrong. I figured since I had everything set up, I might as well get a good picture of a puppet. As mentioned before, I have not been doing much with puppets lately. Of course, it was puppets that led me to masks. It seems often times that "masks and puppets" are mentioned together. They have much in common in performance and in creation.

Puppets have been on my mind lately though as I am participating as part of a design team for an upcoming performance in Milwaukee come January. I'm sure I will have more to share later this month, but for now, I will let you know that there will be some overhead projected puppet madness in this show. Stay tuned for more info...

Sunday, December 6, 2009

Neoprene Neutral Mask in the works

Here is a sneak peak at another mask I am working on; this one cast in neoprene rubber...

neoprene neutral mask in the raw

It still needs finishing touches with a rotary tool and also paint and straps. But soon it will be a finished mask and my third attempt at creating a neutral mask.

Thursday, December 3, 2009

Long nose and long chin mask. Man or old woman?

I will write more about this guy (or it an old woman?) soon...

Big Nose with other masks

I should also have the gallery updated soon so that this mask along with the others in the background have proper display. One of those masks in the background is neoprene, the rest are paper mache.

Monday, November 30, 2009

Raccoon Creature Full-head Paper Mache Mask

Here is one of the many masks that I am currently working on:

Raccoon Creature

It started out as a raccoon but soon turned into more of a creature of sorts. I liked the direction it was headed, so I decided not to mind that it no longer looked much like a raccoon. That and then the fact that when I was frustrated with this mask and wanted to destroy it, Danijela said that I mustn't.

Thursday, November 19, 2009

Old video of my hands as puppets

The following video is not of the best quality but I just ran across it and uploaded it for your viewing pleasure. I recorded it in one take for a project in a playwriting class of mine a few years back. No, it's not masks, but if it had not been for my interest in puppetry I may never have heard masks calling my name...

Tuesday, November 17, 2009

Mask workshops and Squirrel Girl

More news coming soon. I am keeping busy with my mask making while at the same time I have some other mask related plans in the works. Look for workshops and other events in the future. Someday I will get better at this blogging thing and actually update more frequently.

Until next time, here is a photo with the squirrel mask for your enjoyment...

she squirrel

Saturday, October 31, 2009

Happy Halloween!

Happy Halloween

I figured it was time to take out the carving tools I brought back from Bali and carve something. I feel kind of rusty and need to start practicing again.

Happy Halloween

Happy Halloween!

Tuesday, October 27, 2009

Plaster mold-making tutorial for neoprene mask

Time for a quick tutorial on plaster mold-making. Lately I have been working directly with plastaline (and plasticine) clay as a positive mold. I apply layers of papier-mache over-top of the clay (with a release layer so the glue does not stick to the clay) and skip the plastering process. The downside to this method is the loss of detail. Then again, the masks that I have been working on lately have been lacking fine detail and so this method works just fine. The other drawback is that I have less clay to work with on other masks while I am completing the layers of papier-mache. This may, however, be a good thing as it keeps me focused and gets me to finish a mask straight through.

There was a time when I made most of my masks in negative plaster molds. One reason for this was to retain detail. The other advantage is the ability to create duplicate masks from the same plaster mold (this is sometimes possible with a positive clay mold with a few touch-ups in-between castings). The other main reason I was using plaster molds was because I was casting more neoprene masks.

I get my neoprene rubber (a sort of synthetic latex) from Chicago Latex a division of Spartan Adhesives down in Chicago. It is convenient for me because shipping is included in the price and I receive my order the following day. I will go into more detail regarding my use of neoprene in a different post but for now, the thing to understand about neoprene is that it uses a slipcasting technique.

Slipcasting is the process of pouring the liquid neoprene (or other casting compound such as latex or liquid pottery clay) into a plaster mold and filling to the top. The neoprene is left in the mold for 1 to 3 hours depending on the thickness of my mask and the dryness of the plaster mold. A dry plaster mold helps to speed the curing process as it wicks the moisture away from the neoprene. This creates a layer of semi-cured neoprene and then the inner left-over liquid is poured off (and re-used). Another few days and the mask can be released from the mold in order to dry for a few more days still.

Neoprene is more expensive and requires a plaster mold but in the end is much less time-consuming that paper-mache. Of course, the more experience a person gets with paper mache, the gap is closed somewhat. Now finishing with the neoprene tangent, back to the plaster mold casting.

Plastaline Clay Mask of Boy

[First, I will begin by apologizing for the low-light photographs of this tutorial. The basement where I am currently using plaster does not offer great conditions for my camera. Still, I wanted to share my process and so the photos are what they are.]

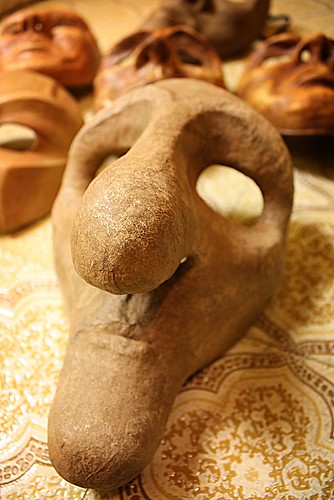
I start with a mask modeled in plastaline. The mask is deeper than the finished product will become because I must have an even surface in order to fill the neoprene.

Plaster splash box

I use a splattering technique for the initial application of the plaster, so I like to use a wooden box (discarded dresser drawer) as a splash protector.

For mixing the plaster, I first place an estimated amount of water into a flexible plastic bowl. I say flexible because I want to be able to break any remaining plaster out of the bowl once it has hardened and the easiest way I have found to do this is by twisting the bowl. You can also spray the bowl with a quick mist of cooking spray to help with the release but I have only tried that once (it worked well but I do not have much issue without it either).

The estimation of how much water to put in the bowl comes with experience. The other note that comes from experience is that it is better to have too much plaster than not enough. I am definitely not one that wants to waste resources but when I am working on a project, I do not want to risk ruining the entire thing by not having enough plaster. It is possible to mix up more plaster quickly but most likely the initial plaster will begin to cure and the layers may not adhere to each other. I am sure you can measure and calculate in order to come to a proper dose but I am not much for that and it was not the way I was taught.

I also do not measure the plaster that I mix with the water. Speaking of plaster, there are many different types of plaster. For this project I am using plaster of paris that I have left over from a trip to the hardware store. I do not recommend getting plaster at the craft store because it is expensive. Even at the hardware store it is relatively expensive but not nearly as bad and it comes in a larger 12lb bag. It is quicker to take the trip to the local hardware store than go out to the gypsum supply company. There are also stronger plasters that one can use but my use has never warranted the extra expense (yet).

Plaster "Island" method

I grab handfuls of plaster from the bag and put it into the water. I do not worry too much about sifting the plaster into the water to avoid air bubbles. The next step rids of that. I continue adding plaster until I have created an island of plaster that does not sink down. Now I let it sit for a few minutes. Above you can see a before and after shot of the island. In the picture on the right, it is possible to see how the plaster has changed and risen slightly. Leaving it at this stage, it will not cure quickly at all. It must be mixed. If you need to work with a lot of plaster on a large mold, it is possible to use two bowls/buckets. Let the plaster sit like this in one bowl and then gently remove some of the plaster/water and mix it in the second bowl. This way the first bowl will still be mixable after applying some of the plaster.

Plaster at starting consistency

I wear gloves in the plastering process mainly for easy clean-up. That and when I have worked with plaster more regularly, my hands get very dry and cracked (they already get dry enough from riding my bicycle in the winter). I mix the plaster by hand. Having let the plaster rest for the first few minutes, it greatly helps reduce air bubbles. After a minute or two of mixing the plaster becomes a consistency of thick syrup at which point I can begin the application process. If it remains thin and does not flow smoothly from my hand, it is still possible to add more plaster. Note, that adding more plaster at this point does create more air bubbles and speeds up the setting time of the plaster (meaning less workable time). Even with the warning, I have had to add more plaster many times when I was not paying close enough attention and the molds came out just fine (and sometimes a faster set time was desired).

ATTENTION: Did I remember to use a mold release on the wood board?!

This is one step that is easily overlooked but can be important. I tend not to put a mold release on the plastaline clay but I will put some on the wood board that holds the plastaline. Without the mold release, the plaster may adhere quite strongly to the board and become difficult to remove. Of course, I have forgotten this step in the past and still managed to release the plaster mold but it is not worth the risk. Having been awhile since last making a mold I nearly forgot this step on this project. I would usually use Murphy's Oil, dish detergent, or hand-soap as a release agent in this application but instead I grabbed petroleum jelly. I do not like using petroleum jelly as it is hard to remove from the plaster. I will never use petroleum jelly on my clay because the jelly will form a layer in the plaster mold which will inhibit the process of neoprene slipcasting.

"Splash" method of Plaster application

Now comes the messy part. I begin to splatter/splash the clay with the syrupy plaster. I flick my fingers with force in order to break out any air bubbles that form. Most of the time this method works very well for me and air bubbles are non-existant.

"Splash" method of plastering

Another technique is to brush the liquid plaster onto the clay to fill in the detail. I find that flicking works just as well for most applications. If I am really worried about detail, I may brush instead.

Thicker application of plaster to model

As the plaster continues to thicken I begin pour handfuls onto the already splattered plaster. If it is too thin, the plaster will run freely over the sides. When it is thicker, it will begin to hold on the form. I continue to scoop and apply in order to cover the entire form. This is when the process usually speeds up. Work fast and efficient and there will be no troubles. If a person takes too much time in the process, the plaster will harden and be no longer workable before the form is sufficiently covered.

Curing plaster mold

I smooth the plaster mold as it hardens further. Since I will be pouring neoprene rubber into my molds, I like to leave a flat surface on the top so that when I flip it over it sits flat. But sometimes I am slightly short on plaster and will leave this step out because I do not want to risk making the plaster too thin at the tip of the nose.

Removing plastaline mask from plaster mold

As the plaster cures, it will heat up. Once it cools down (20 minutes to an hour) it is then possible to release the clay model from the plaster mold. I take a hammer and chisel, screwdriver, or putty knife to separate the wood from the plaster. Then I pull out the clay from the plaster mold. Sometimes this is an easy process where the clay pops out, but other times it is a slower one where I have to dig out some of the clay in order to get a good grip.

Finished plaster mold of mask

The finished plaster mold. The whole process is rather quick. Sometimes I have been impatient and needed to de-mold sooner than waiting for the plaster to fully cool down. Luckily I have not had breakage in the past, but now I generally will wait before removing the clay.

Now this was only the basic overview of plaster mold-making technique. I did not cover in this post the importance of understanding under-cuts or different ways of strengthening plaster by way of burlap or cloth. More to come in later posts but in the meantime this is plenty of information to get out there and start experimenting!

Monday, September 7, 2009

Squirrel Mask Positive Mold: Newsprint, Coffee Filters, and Wood Glue Paper Mache

After reviewing the potential undercuts on the plasticine model of the squirrel mask, I decided that the ears were going to to cause more hassle than I wanted for this particular mask. Instead of creating a negative plaster mold, I have opted for using the plasticine as a positive mold. I am using a layering paper mache technique with newsprint, unbleached coffee filters, and wood glue (TiteBond II).

The first time I read of using newsprint and coffee filters was about a year ago on the puptcrit mailing list from an avid contributor whose blog you can find here: Creaturiste's Laboratory. Mathieu (a.k.a. Creaturiste) is an advocate of paper mache for puppet and mask construction. And rightfully so! With proper techniques, supplies, time and patience, it is possible to create durable works of art that have lasting potential equal to or greater than other materials.

Starting with a layer of wet newsprint torn into small pieces, I am able to create a protective cover for the clay or plaster mold.

Squirrel Mask Newsprint Layer


There is no glue involved in the first layer except for at the end. I soak the newsprint strips in water and then apply them to the clay mold. For detailed sections, I tear the strips even smaller.

Squirrel Mask Newsprint Layer


Once the entire mold is covered, I carefully apply a light coat of glue diluted with water to connect and seal this newsprint layer. The reason I use newsprint instead of coffee filters for this layer is that if I were to use coffee filters, the glue may very well soak through to the mold and adhere to the surface. The newsprint forms a thick enough barrier for this not to happen but is still thin enough to produce good detail.

Squirrel Mask Newsprint Layer


Allowing the newsprint and glue to fully dry before apply coffee filters allows the layer proper time so as not to warp or deform. I have not tried skipping this step as I usually have plenty other tasks to attend to that I have no need to jump directly to applying the next layer.

Up next will be the application of unbleached coffee filters and glue which is a very time consuming process with a larger mask such as this one.

Thursday, September 3, 2009

Squirrel model nearly finished

The squirrel clay model is nearly finished. Just a few touches and it will be ready for casting. This one will be cast in plaster and I will use the negative mold to form the mask out of paper and glue. If it turns out well, I may eventually try casting another squirrel mask in neoprene but for now I do not have enough liquid neoprene to fill the mold.

Squirrel Mask in Plastaline

Again, why a squirrel? I have never given much attention to them in the past other than to watch them sneak food out of bird feeders and such. They do seem rather clever creatures. I have been watching them more now that my girlfriend and I have a a new dog in our family. Opal, the dog, is very fascinated by the countless squirrels in our neighborhood. She has brought it to my attention that the squirrel offers a bit of a link between the world that I currently inhabit and one I wish to surround myself with in the future. The squirrel as urban dweller, living amongst humans and traffic, has its counterpart; the rural or woodland squirrel.

This squirrel mask being the first in this series of forty-eight masks also demarcates a conscious move toward my goals. The dream in its current form is to one day, in the relatively near future, have a backyard that resembles the realm of the rural squirrel where I may construct my art studio and make so many more masks (that is a lot of "m"s).

Of course, I realize the challenges of urban life will only be replaced by those of the forest and so is the case for squirrels according to The Squirrel Place:
"Urban squirrels tend to have a smaller territory, they sometimes have to share resources to survive. They also have learned, to coexist with humans. While rural squirrels are more protective of their territory, and they have more natural predators to deal with."
Sorry to the rural squirrels, for one day Opal may be one of those "natural" predators. Luckily she is a little too noisy and bounds to playfully toward the urban squirrels to cause more than a nuisance. Personally, in my anthropomorphic opinion, I think the squirrels have fun tormenting the dogs in this neighborhood anyway.

Returning to mask discussion, my plan is to begin with plaster tomorrow. More photos to follow soon!

Tuesday, September 1, 2009

Day One

Today marks the start of a personal challenge. Over the next six months I will create forty-eight masks with full documentation of the process recorded here. Once complete, I will have a body of work for my portfolio and future exhibits as well as a few new followers of this blog. My hope is that my web presence will expose some of the reasons why I create what I do as well as share the techniques I practice (and all the new lessons that will arise from this project) with others. Beyond mask making, this blog will investigate fascinations with the human and non-human face.

The mask I am working on today is a full-head squirrel mask. Why a squirrel? Because our recently adopted six-year old dog, Opal, loves them. More reasoning behind this mask will come as the process continues.


This photo shows the beginning stages of the sculpture in plastaline. I am currently working with the sulfur-free Le Beau Touché by Chavant. I rarely make silicone molds so the reason I like sulfur-free plastaline is because it does not have the lingering smell that I both love and hate (maybe love is a little strong, but it does make me think of happy sculpting times). That and I wonder what potentially damaging results come from sulfur either health wise or environmentally. I have heard it can effect electronic equipment but have not reviewed any studies on this. Anyone have links to facts on how non-toxic the sulfur in oil-based clay really is or is not?

Look for more on the squirrel and other masks very soon.